Click here to read basic VBA Training and Tutorial
VBA Events
VBA Events
VBA, an event driven programming can be triggered when you change a cell or range of cells value manually. Change Event may make things easier, but you can very quickly end up a page full of formatting. There are two kinds of events.
- Worksheet Events
- Workbook Events
WorkSheet Events
Worksheet Events are triggered when there is a change in the worksheet. It is created by performing right-click on the sheettab and choosing 'view code', and then pasting the code.
User can select each one of those worksheets and choose "WorkSheet" from the drop down to get the list of all supported Worksheet events.
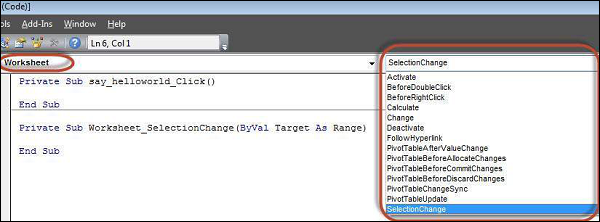
Below are the supported worksheet events that can be added by the user.
Private Sub Worksheet_Activate()
Private Sub Worksheet_BeforeDoubleClick(ByVal Target As Range, Cancel As Boolean)
Private Sub Worksheet_BeforeRightClick(ByVal Target As Range, Cancel As Boolean)
Private Sub Worksheet_Calculate()
Private Sub Worksheet_Change(ByVal Target As Range)
Private Sub Worksheet_Deactivate()
Private Sub Worksheet_FollowHyperlink(ByVal Target As Hyperlink)
Private Sub Worksheet_SelectionChange(ByVal Target As Range)
Example
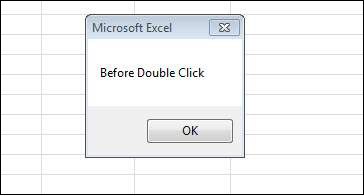
Let us say, we just need to display a message before double click.
Private Sub Worksheet_BeforeDoubleClick(ByVal Target As Range, Cancel As Boolean)
    MsgBox "Before Double Click"
End Sub
Output
Upon double clicking on any cell, the message box is displayed to the user as shown below.
Workbook Events
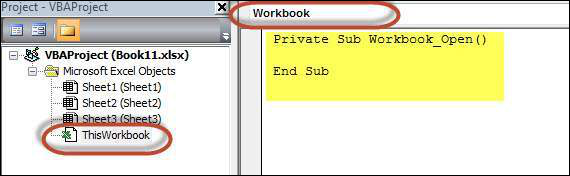
Workbook events are triggered when there is a change to the workbook on the whole. We can add the code for workbook events by selecting the 'ThisWorkbook' and selecting 'workbook' from the dropdown as shown below. Immediately Workbook_open sub procedure is displayed to the user as shown below.
Below are the supported WorkBook events that can be added by the user.
Private Sub Workbook_AddinUninstall()
Private Sub Workbook_BeforeClose(Cancel As Boolean)
Private Sub Workbook_BeforePrint(Cancel As Boolean)
Private Sub Workbook_BeforeSave(ByVal SaveAsUI As Boolean, Cancel As Boolean)
Private Sub Workbook_Deactivate()
Private Sub Workbook_NewSheet(ByVal Sh As Object)
Private Sub Workbook_Open()
Private Sub Workbook_SheetActivate(ByVal Sh As Object)
Private Sub Workbook_SheetBeforeDoubleClick(ByVal Sh As Object, ByVal Target As Range, Cancel As Boolean)
Private Sub Workbook_SheetBeforeRightClick(ByVal Sh As Object, ByVal Target As Range, Cancel As Boolean)
Private Sub Workbook_SheetCalculate(ByVal Sh As Object)
Private Sub Workbook_SheetChange(ByVal Sh As Object, ByVal Target As Range)
Private Sub Workbook_SheetDeactivate(ByVal Sh As Object)
Private Sub Workbook_SheetFollowHyperlink(ByVal Sh As Object, ByVal Target As Hyperlink)
Private Sub Workbook_SheetSelectionChange(ByVal Sh As Object, ByVal Target As Range)
Private Sub Workbook_WindowActivate(ByVal Wn As Window)
Private Sub Workbook_WindowDeactivate(ByVal Wn As Window)
Private Sub Workbook_WindowResize(ByVal Wn As Window)
Example
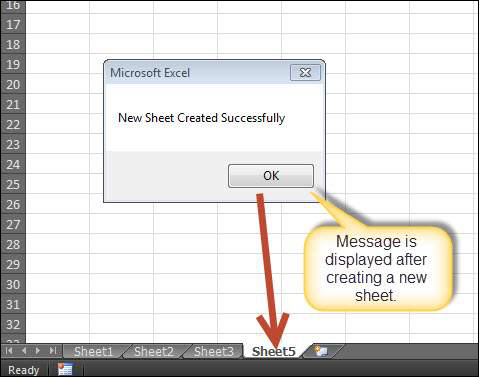
Let us say, we just need to display a message to the user that a new sheet is created succesfully whenever a new sheet is created.
Private Sub Workbook_NewSheet(ByVal Sh As Object)
    MsgBox "New Sheet Created Successfully"
End Sub
Output
Upon creating a new excel sheet a message is displayed to the user as shown below.
VBA - Error Handling
There are three types of errors in programming: (a) Syntax Errors and (b) Runtime Errors (c) Logical Errors.
Syntax errors
Syntax errors, also called parsing errors, occur at interpretation time for VBScript. For example, the following line causes a syntax error because it is missing a closing parenthesis:
Function ErrorHanlding_Demo()
dim x,y
x = "Tutorialspoint"
y = Ucase(x
End Function
Runtime errors
Runtime errors, also called exceptions, occur during execution, after interpretation.
For example, the following line causes a runtime error because here syntax is correct but at runtime it is trying to call fnmultiply, which is a non-existing function:
Function ErrorHanlding_Demo1()
  Dim x,y
  x = 10
  y = 20
  z = fnadd(x,y)
  a = fnmultiply(x,y)
End Function

Function fnadd(x,y)
      fnadd = x+y
End Function
Logical errors
Logic errors can be the most difficult type of errors to track down. These errors are not the result of a syntax or runtime error. Instead, they occur when you make a mistake in the logic that drives your script and you do not get the result you expected.
You can not catch those errors, because it depends on your business requirement what type of logic you want to put in your program.
For example, dividing a number by zero or a script that is written which enters into infinite loop.
Err Object
Assume if we have a runtime error, then the execution stops by displaying the error message. As a developer, if we want to capture the error, then Error Object is used.
Example
In the below example, Err.Number gives the error number and Err.Description gives error description.
  Err.Raise 6   ' Raise an overflow error.
  MsgBox "Error # " & CStr(Err.Number) & " " & Err.Description
  Err.Clear   ' Clear the error.
Error Handling
VBA Enables an error-handling routine and can also be used to disable an error-handling routine. Without an On Error statement, any run-time error that occurs is fatal: an error message is displayed, and execution stops abruptly.
On Error { GoTo [ line | 0 | -1 ] | Resume Next }
| Keyword | Description |
|---|---|
| GoTo line | Enables the error-handling routine that starts at the line specified in the required line argument. The specified line must be in the same procedure as the On Error statement, or a compile-time error will occur. |
| GoTo 0 | Disables enabled error handler in the current procedure and resets it to Nothing. |
| GoTo -1 | Disables enabled exception in the current procedure and resets it to Nothing. |
| Resume Next | Specifies that when a run-time error occurs, control goes to the statement immediately following the statement where the error occurred, and execution continues from that point |
EXAMPLE
Public Sub OnErrorDemo()
   On Error GoTo ErrorHandler   ' Enable error-handling routine.
   Dim x, y, z As Integer
   x = 50
   y = 0
   z = x / y   ' Divide by ZERO Error Raises

   ErrorHandler:    ' Error-handling routine.
   Select Case Err.Number   ' Evaluate error number.
      Case 10   ' Divide by zero error
         MsgBox ("You attempted to divide by zero!")
      Case Else
         MsgBox "UNKNOWN ERROR  - Error# " & Err.Number & " : " & Err.Description
   End Select
   Resume Next
End Sub
VBA Excel Objects
What are Excel Objects
When programming using VBA, there are few important objects that a user would be dealing with.
- Application Objects
- WorkBook Objects
- WorkSheet Objects
- Range Objects
Application Objects
The Application object consists of the following
- Application-wide settings and options.
- Methods that return top-level objects, such as ActiveCell, ActiveSheet, and so on.
Example
'Example 1 :
Set xlapp = CreateObject("Excel.Sheet")
xlapp.Application.Workbooks.Open "C:\test.xls"

'Example 2 :
Application.Windows("test.xls").Activate

'Example 3:
Application.ActiveCell.Font.Bold = True
WorkBook Objects
The Workbook object is a member of the Workbooks collection and contains all the Workbook objects currently open in Microsoft Excel.
Example
'Ex 1 : To close Workbooks
Workbooks.Close

'Ex 2 : To Add an Empty Work Book
Workbooks.Add

'Ex 3: To Open a Workbook
Workbooks.Open FileName:="Test.xls", ReadOnly:=True

'Ex : 4 - To Activate WorkBooks
Workbooks("Test.xls").Worksheets("Sheet1").Activate
Worksheet Objects
The Worksheet object is a member of the Worksheets collection and contains all the Worksheet objects in a workbook.
Example
'Ex 1 : To make it Invisible
Worksheets(1).Visible = False

'Ex 2 : To protect an WorkSheet
Worksheets("Sheet1").Protect password:=strPassword, scenarios:=True
Range Objects
Range Objects Represents a cell, a row, a column, a selection of cells containing one or more continuous blocks of cells.
'Ex 1 : To Put a value in the cell A5
Worksheets("Sheet1").Range("A5").Value = "5235"

'Ex 2 : To put a value in range of Cells
Worksheets("Sheet1").Range("A1:A4").Value = 5
VBA Text Files
VBA Text Files
We can also read Excel File and write the contents of the cell into a Text File. This way, VBA allows users to work with text files. We can work with test files using two methods
- File System Object
- using Write Command
Using File System Object(FSO)
As the name suggests, FSO Objects help the developers to work with drives, folders and files. In this section, we will discuss how to use FSO.
| Object Type | Description |
|---|---|
| Drive | Drive is an Object. Contains methods and properties that allow you to gather information about a drive attached to the system |
| Drives | Drives is a Collection. It Provides a list of the drives attached to the system, either physically or logically. |
| File | File is an Object. It Contains methods and properties that allow developers to create, delete or move a file. |
| Files | Files is a Collection. It Provides a list of all files contained within a folder. |
| Folder | Folder is an Object. It Provides methods and properties that allow developers to create, delete or move folders. |
| Folders | Folders is a Collection. It Provides a list of all the folders within a Folder. |
| TextStream | TextStream is an Object. It enables developers to read and write text files. |
Drive
Drive is an object, which provides access to the properties of a particular disk drive or network share. The Following properties are supported by Drive object:
- AvailableSpace
- DriveLetter
- DriveType
- FileSystem
- FreeSpace
- IsReady
- Path
- RootFolder
- SerialNumber
- ShareName
- TotalSize
- VolumeName
Example
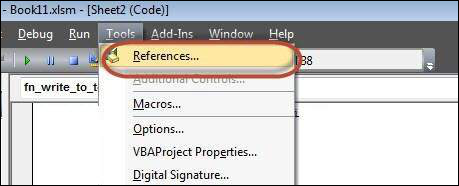
Step 1 : Before proceeding to scripting using FSO, we should enable Microsoft Scripting Runtime. To do the same, Navigate to "Tools" >> "References" as shown below :
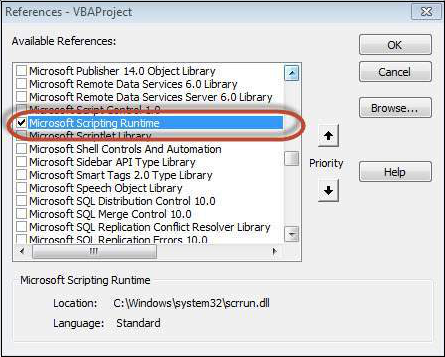
Step 2 : Add "Microsoft Scripting RunTime" and Click OK.
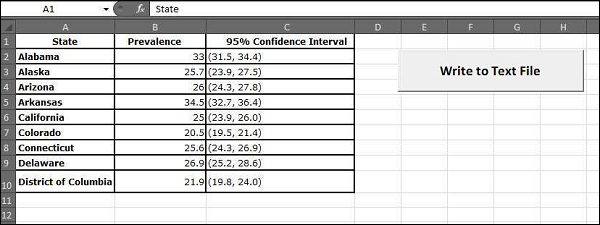
Step 3 : Add Data that you would like to write it to a Text File and add a Command Button.
Step 4 : Now it is time to Script.
Private Sub fn_write_to_text_Click()
  Dim FilePath As String
  Dim CellData As String
  Dim LastCol As Long
  Dim LastRow As Long

  Dim fso As FileSystemObject
  Set fso = New FileSystemObject
  Dim stream As TextStream

  LastCol = ActiveSheet.UsedRange.Columns.Count
  LastRow = ActiveSheet.UsedRange.Rows.Count

  ' Create a TextStream.
  Set stream = fso.OpenTextFile("D:\Try\Support.log", ForWriting, True)

  CellData = ""

  For i = 1 To LastRow
      For j = 1 To LastCol
      CellData = Trim(ActiveCell(i, j).Value)
      stream.WriteLine "The Value at location (" & i & "," & j & ")" & CellData
      Next j
  Next i

  stream.Close
  MsgBox ("Job Done")
End Sub
Output
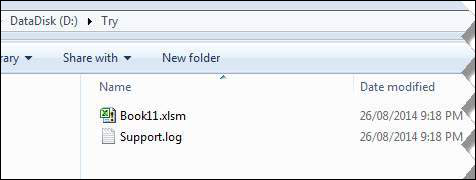
When executing the script, ensure that you place the cursor in the first cell of the worksheet. The Support.log file is created as shown below under "D:\Try".
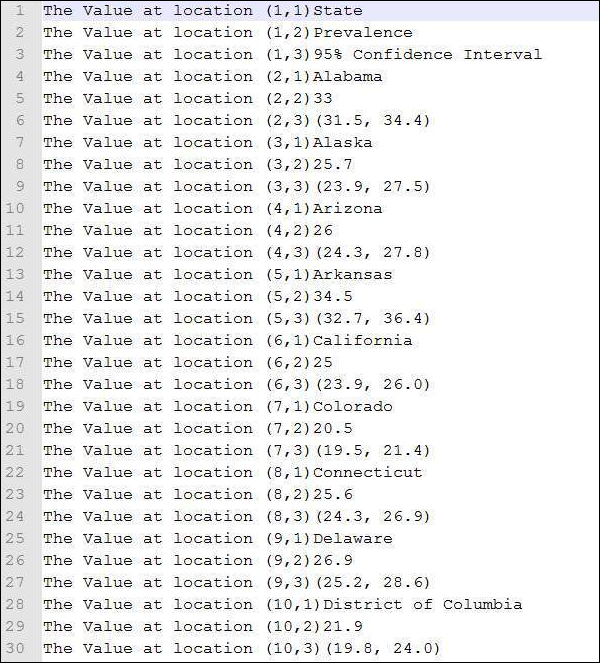
The Contents of the file is also shown below :
Using Write Command
unlike FSO, we need NOT add any references, however we will NOT be able to work Drives, Files and Folders. We will be able to just add the stream to text file.
Example
Private Sub fn_write_to_text_Click()
  Dim FilePath As String
  Dim CellData As String
  Dim LastCol As Long
  Dim LastRow As Long

  LastCol = ActiveSheet.UsedRange.Columns.Count
  LastRow = ActiveSheet.UsedRange.Rows.Count

  FilePath = "D:\Try\write.txt"
  Open FilePath For Output As #2

  CellData = ""
  For i = 1 To LastRow
      For j = 1 To LastCol
      CellData = "The Value at location (" & i & "," & j & ")" & Trim(ActiveCell(i, j).Value)
      Write #2, CellData
      Next j
  Next i

  Close #2
  MsgBox ("Job Done")
End Sub
Output
Upon executing the script, the "write.txt" file is created in the location "D:\Try" as shown below.

The Contents of the file is also shown below :
VBA - Programming Charts
VBA - Programming Charts
Using VBA, we will be able to do generate Charts based on certain criteria. Let us take a look at it with an example.
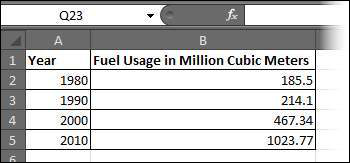
Step 1 : First Enter the data against which the graph has to be generated.
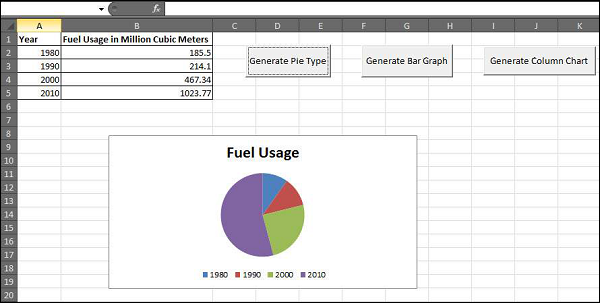
Step 2 : Let us create 3 buttons one to generate Bar graph, pie Chart, Column Chart.

Step 3 : Now let us develop a Macro to generate each one of these type of charts
' Procedure to Generate Pie Chart
Private Sub fn_generate_pie_graph_Click()
    Dim cht As ChartObject
    For Each cht In Worksheets(1).ChartObjects
        cht.Chart.Type = xlPie
    Next cht
End Sub


' Procedure to Generate Bar Graph
Private Sub fn_Generate_Bar_Graph_Click()
    Dim cht As ChartObject
    For Each cht In Worksheets(1).ChartObjects
        cht.Chart.Type = xlBar
    Next cht
End Sub

' Procedure to Generate Column Graph
Private Sub fn_generate_column_graph_Click()
    Dim cht As ChartObject
    For Each cht In Worksheets(1).ChartObjects
        cht.Chart.Type = xlColumn
    Next cht
End Sub
Step 4 : Upon clicking on the corresponding button, that chart is created. In the below output we have clicked on generate Pie Chart button.
VBA - User Forms
VBA - User Forms
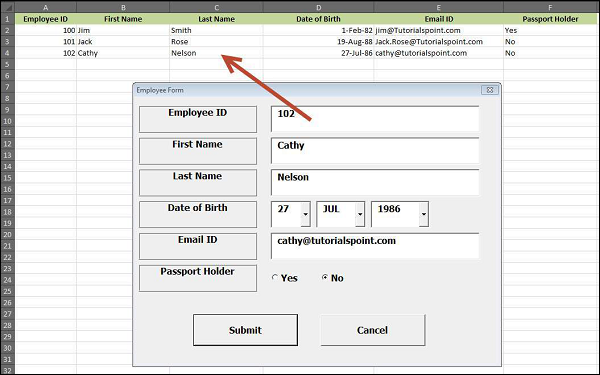
A UserForm is a custom-built dialog box that makes a user data entry more controllable for you and easier for the user. In this chapter, we will design a Simple form and add data into excel.
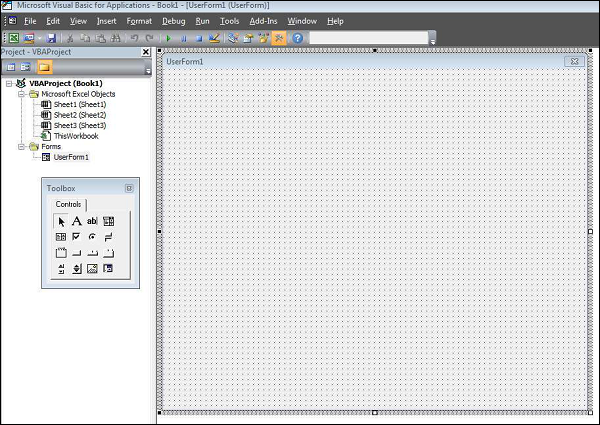
Step 1 : Navigate to VBA Window by pressing Alt+F11 and Navigate to "Insert" Menu and select "User Form". Upon selecting, user form is displayed below.
Step 2 : Now let us design the forms using the given controls.
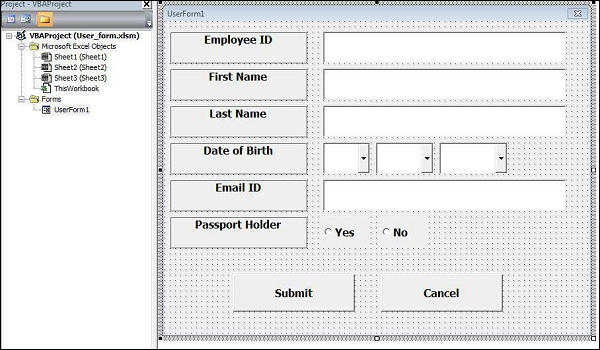
Step 3 : After adding each controls, the controls has to be named. Caption corresponds to what appears on the form and name corresponds to the logical name which will be appearing while we write VBA code for that element.
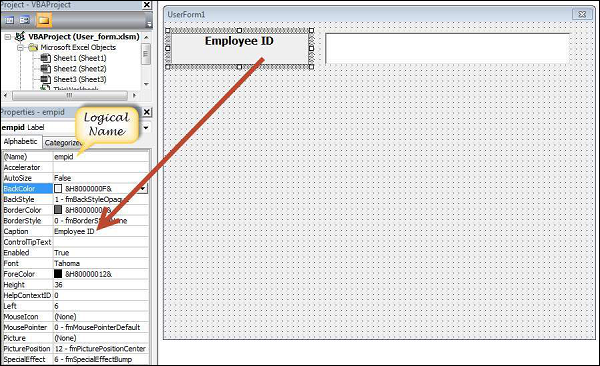
Step 4 : Below are names against each one of the added controls.
| Control | Logical Name | Caption |
|---|---|---|
| From | frmempform | Employee Form |
| Employee ID Label Box | empid | Employee ID |
| firstname Label Box | firstname | First Name |
| lastname Label Box | lastname | Last Name |
| dob Label Box | dob | Date of Birth |
| mailid Label Box | mailid | Email ID |
| Passportholder Label Box | Passportholder | Passport Holder |
| Emp ID Text Box | txtempid | NOT Applicable |
| First Name Text Box | txtfirstname | NOT Applicable |
| Last Name Text Box | txtlastname | NOT Applicable |
| Email ID Text Box | txtemailid | NOT Applicable |
| Date Combo Box | cmbdate | NOT Applicable |
| Month Combo Box | cmbmonth | NOT Applicable |
| Year Combo Box | cmbyear | NOT Applicable |
| Yes Radio Button | radioyes | Yes |
| No Radio Button | radiono | No |
| Submit Button | btnsubmit | Submit |
| Cancel Button | btncancel | Cancel |
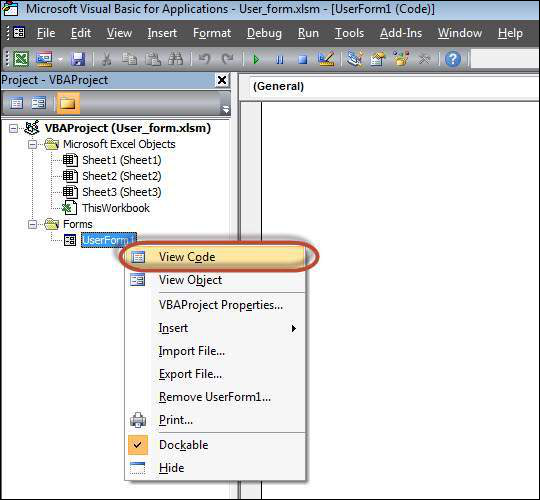
Step 5 : Now we will add code for the form load event by performing right click on the form and selecting 'View Code'.
Step 6 : Select userform from the objects drop down and select 'Initialize' method as shown below.

Step 7 : Upon Loading the Form we should ensure that the text boxes are cleared, Drop down boxes are filled and Radio buttons are resetted
Private Sub UserForm_Initialize()

   'Empty Emp ID Text box and Set the Cursor
   txtempid.Value = ""
   txtempid.SetFocus

   'Empty all other text box fields
   txtfirstname.Value = ""
   txtlastname.Value = ""
   txtemailid.Value = ""

   'Clear All Date of Birth Related Fields
   cmbdate.Clear
   cmbmonth.Clear
   cmbyear.Clear

   'Fill Date Drop Down box - Takes 1 to 31
   With cmbdate
   .AddItem "1"
   .AddItem "2"
   .AddItem "3"
   .AddItem "4"
   .AddItem "5"
   .AddItem "6"
   .AddItem "7"
   .AddItem "8"
   .AddItem "9"
   .AddItem "10"
   .AddItem "11"
   .AddItem "12"
   .AddItem "13"
   .AddItem "14"
   .AddItem "15"
   .AddItem "16"
   .AddItem "17"
   .AddItem "18"
   .AddItem "19"
   .AddItem "20"
   .AddItem "21"
   .AddItem "22"
   .AddItem "23"
   .AddItem "24"
   .AddItem "25"
   .AddItem "26"
   .AddItem "27"
   .AddItem "28"
   .AddItem "29"
   .AddItem "30"
   .AddItem "31"
   End With

   'Fill Month Drop Down box - Takes Jan to Dec
   With cmbmonth
   .AddItem "JAN"
   .AddItem "FEB"
   .AddItem "MAR"
   .AddItem "APR"
   .AddItem "MAY"
   .AddItem "JUN"
   .AddItem "JUL"
   .AddItem "AUG"
   .AddItem "SEP"
   .AddItem "OCT"
   .AddItem "NOV"
   .AddItem "DEC"
   End With


   'Fill Year Drop Down box - Takes 1980 to 2014
   With cmbyear
    .AddItem "1980"
    .AddItem "1981"
    .AddItem "1982"
    .AddItem "1983"
    .AddItem "1984"
    .AddItem "1985"
    .AddItem "1986"
    .AddItem "1987"
    .AddItem "1988"
    .AddItem "1989"
    .AddItem "1990"
    .AddItem "1991"
    .AddItem "1992"
    .AddItem "1993"
    .AddItem "1994"
    .AddItem "1995"
    .AddItem "1996"
    .AddItem "1997"
    .AddItem "1998"
    .AddItem "1999"
    .AddItem "2000"
    .AddItem "2001"
    .AddItem "2002"
    .AddItem "2003"
    .AddItem "2004"
    .AddItem "2005"
    .AddItem "2006"
    .AddItem "2007"
    .AddItem "2008"
    .AddItem "2009"
    .AddItem "2010"
    .AddItem "2011"
    .AddItem "2012"
    .AddItem "2013"
    .AddItem "2014"
   End With

   'Reset Radio Button. Set it to False when form loads.
   radioyes.Value = False
   radiono.Value = False

End Sub
Step 8 : Now we need to add code to the Submit button. Upon Clicking on submit button user Should be able to Add the values into the worksheet.
Private Sub btnsubmit_Click()
  Dim emptyRow As Long

  'Make Sheet1 active
  Sheet1.Activate

  'Determine emptyRow
  emptyRow = WorksheetFunction.CountA(Range("A:A")) + 1

  'Transfer information
  Cells(emptyRow, 1).Value = txtempid.Value
  Cells(emptyRow, 2).Value = txtfirstname.Value
  Cells(emptyRow, 3).Value = txtlastname.Value
  Cells(emptyRow, 4).Value = cmbdate.Value & "/" & cmbmonth.Value & "/" & cmbyear.Value
  Cells(emptyRow, 5).Value = txtemailid.Value

  If radioyes.Value = True Then
      Cells(emptyRow, 6).Value = "Yes"
  Else
      Cells(emptyRow, 6).Value = "No"
  End If
End Sub
Step 9 : Now add a method to close the form when user clicks on cancel button.
Private Sub btncancel_Click()
    Unload Me
End Sub
Step 10 : Now Let us Execute the Form by clicking on "run" Button. Enter values into the form and click 'Submit' button. Automatically the values would flow into the worksheet as shown below.